Scene configuration
Now you have the UnrealROX project you will learn how to use it properly. First of all you need to get a photorrealistic scene or create your own. The scenes we used are the following:
Import scene to UnrealROX
To import your scene to the UnrealROX project you need to:
- Migrate your scene to UnrealROX. On the one hand we have the UnrealROX project to which we want to import the scene from other UE4 project. Open your scene project and go to the Content Browser and localize .umap file of your scene, right-click and go to Asset Actions->Migrate. Now you need to navigate to the Content folder of UnrealROX project and select it as target for migrating your scene.
Do you need a robot for you scene?
- (Experimental) Import your own robot. We are currently working on this feature (import a robot using its URDF robot model). In order to import your own robot you need the corresponding meshes, textures and skeleton. You also need to define constraints to control robot’s movement and physics simulation. Then you need to configure the grasping system placing some triggers (e.g. sphere triggers) on robot’s fingers/gripper and also code a new logic for the new hand or gripper.
- Put the robot in your scene. From this point we will only work on the UnrealROX project. In the UE4 editor go to the Content Browser and navigate to Mannequin->Meshes selecting your pawn (e.g. ROXMannequinPawn) and drag it to the scene. You can scale your robot to match with your scene scale.
Check and configure scene objects!
You need to check object pivots are placed correctly in order to properly simulate physics during interaction. You also need to configure the objects you will interact with. To do this, following the next steps:
Check object pivots. Run your scene and check that all object pivots are placed at the lowest geometric center of the mesh. The mesh center is determined by the X and Y axes values, meanwhile the Z axis value should be the lowest of the mesh. This is important to track all the objects correctly during the recording and playback steps and also for the physics simulation during interaction. However, this is a tedious task thus realistic scenes have lots of objects. Due to this, we use the plugin Pivot Tool which works like a charm (we don’t include it in the project because of license conflicts). We highly recommend to use Pivot Tool, thus you can configure all the objects in seconds.
Configure interactable objects. Choose the object you want to interact with from the World Outlier (by default placed on the right side in the UE4 editor) and do the following:
2.1. You need object to be movable. Go to Transform->Mobility and set the object to Movable. Almost all the objects are static by default.
2.2. You need physics simulation. Go to Physics and check Simulate Physics option.
2.3. You need overlap events. Go to Collision and check Generate Overlap Events option. This is a must for the grasping system in order to grab an object correctly. If this option is disabled, grasping wouldn’t work.
2.4. You need an accurate collision mesh. You also need to check object geometry to achieve a visually plausible grasping. Right-click on the object and Edit. In the Object Editor you need to visualize the simple and complex collision meshes and visually check its accuracy. If object geometry is complex and the collision mesh is rough, you should improve this by auto generating convex collision (go to editor menubar and Collision->Auto Convex Collision) with maximum hull verts and accuracy. For the objects with a complex geometry you should set the Collision Complexity to Use simple collision as complex. In this way you will achieve a more realistic grasping, however, physics simulation will be much more complicated so when interacting with two or more objects you may notice an unstable behavior.
Build scene lighting
Lighting configuration is a time-consuming step. In order to optimize this process pay attention to the general scene lightning configuration.
- Build scene lighting. Now you need to build project lighting! The steps above are very important, especially the step of setting the objects as movable. You need to set lighting configuration according to your PC specs. By default, lighting configuration is too demanding for a mid-high range computer. For a fast and feasible lighting generation we recommend the following configuration you can do in the World Settings->Lightmass. See the Figure 1.
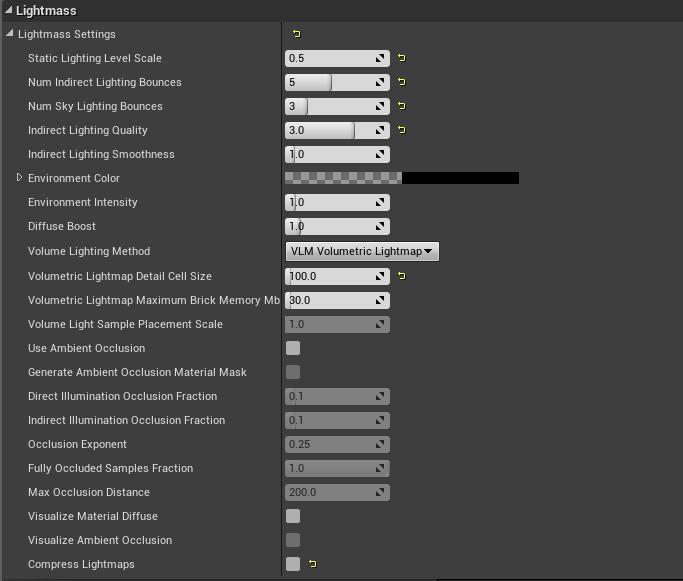
Figure 1. Scene light configuration we used to build lighting and produce photorealistic results.
Scene ready to record your own sequences!