Recording
During the recording process all scene information such as, camera location, its configuration and objects pose and orientation, among others, are dumped in a .txt file which is stored by default on the RecordedSequences folder located in the root of the UnrealROX project. Recording process is the same regardless of used VR hardware. VR controllers have their own input map, so there are different instructions for each of the used hardware.
General configuration
To configure recording process you need to search for ROXTracker in the World Outliner panel from UE4 editor. ROXTracker contains general, recording and playback configuration options. Figure 1 and 2 represent general and specific recording parameters.

Figure 1. General parameters for recording and playback steps. Check Record Mode if you want to record your sequence.
The default path for the Scene Save Directory is the project’s root directory. Scene Folder indicates the folder where recorded sequences are stored. You can freely change these parameters.
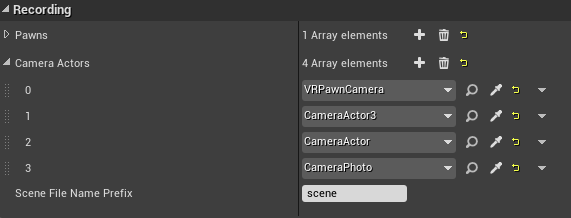
Figure 2. Specific configurable parameters for recording process.
Before start recording you should configure the following parameters:
- Record mode: you should check this option if you want to record your own sequences (see Figure 1).
- Select scene cameras: you should select scene cameras which you want to capture data. Go to Recording->Camera Actors and add the cameras you want to use during recording (see Figure 2).
- Scene file name prefix: you can also configure the prefix filename for the .txt files with the recorded sequences. Default: scene.
Configure HMD position
Before recording you need to check for the HMD position. You need to check if your HMD and its attached camera are in the correct position. This is variable according to user’s height, so, you need to manually configure your main camera position (the main camera is what you see on your Oculus headset). For the configuration [1]:
- with OculusVR: you need to press left joystick to enable HMD position changes. You are now able to change camera position along Z axis using right joystick and also camera translation on X and Y axes with the left joystick. A good tip for adjusting camera position is checking if shoulders position is corresponding with user’s real shoulder position. User’s should also be able to see its chest by looking down.
- with HTC Vive PRO: TODO
Begin/Stop recording
To begin/stop recording, user need to:
- with OculusVR: press A button from the right controller. Press again to stop recording.
- with HTC Vive PRO: TODO
A red collored message will appear both on the screen and HMD when recording a sequence. Once recording process is stopped, a scene.txt file will be created with all scene information.
With the above instructions you will be able to record your own dataset!
| [1] | Once HMD position is configured, restarting the scene using VR controllers wouldn’t change this configuration. |